Extra 10% Off Orders above ₹2499 : Use Code: HUP10
Safest Comfort Helmet for Kids
Free Shipping | 7-Day Free Returns
Lifetime Warranty*
COD Available
by Prachi Gulati
Picture this: your kid is gearing up for their first ever bike ride, but instead of excitedly grabbing their helmets, they mutter, “Do I have to wear this all day long?” Sound familiar? Let’s learn some cool DIY hacks for helmets to change that! With a little creativity, their helmet can go from boring to spectacular—something they’ll want to wear. Helmets covered in cool stickers, or even glowing with reflective lights, can make a big difference. DIY helmet customization is not just an art-and-craft venture—it’s a way to make safety stylish and personal. decorate their helmets
Read More: Cool Bike Accessories for Kids: Enhance your Kids’ Journey
Stickers and decals are one of the best ways to customize the helmet. Giving any helmet a fresh, personalized look is a quick trick. You can decorate their helmets with superheroes, Disney princesses, or dinosaurs.
To add a sporty touch, sports team logos or themed decals are an amazing deal. For extra charm, try using glow-in-the-dark or reflective stickers that light up at night for better visibility. They’re quick to apply and remove, making it simple to update the design whenever your kid wants a change. Moreover, customizing with stickers is mess-free—no paint or glue is required!
Read More: Helmet Safety Ratings: Your Guide to Choosing the Best Helmet
To make a helmet more attractive, DIY it by painting it; it is a fantastic way. This way your kid’s creativity sparkles while making their safety gear on their own. Bright acrylic paints and markers can turn a plain, boring helmet into a colorful masterpiece. If your kids are sure about the designs, using permanent markers is also an amazing way to add finer details, like doodles, names of friends and family, or fun messages. To keep their artwork on the helmet looking fresh and vibrant, apply a clear protective layer that seals and prevents fading or chipping. You can use stencils or painter’s tape for neat, professional-looking patterns. Let your kid take the lead in designing their helmet—it makes the process even more special. Not only will their helmet look awesome, but they’ll also be more excited to wear it every time they head out for a ride.
These are fantastic DIYs for the transformation of a helmet that’s both fun and unique. With an endless variety of colors, patterns, and textures, kids can create a design that matches their personality—whether it’s bright and bold or sleek and subtle. You can smoothly peel off and replace the tapes in case of the wrong appliance. It allows frequent design updates without permanent changes. These are fabulous for intricate designs and come in different playful prints.
You can also use duct tape, it provides a more durable and waterproof feature to the helm, perfect for outdoor adventures. Use these tapes to create stripes, abstract layers, geometric patterns, or cool cartoon characters. Want to talk about the best part? NO DRYING TIME means no mess, no fuss. You have to stick it, smooth it using a scale, and you are good to go! Besides that, kids can change their helmets’ look as often as they want, making it a fun activity. Whether they’re bicycling or skating, a taped-up helmet will always stand out in the crowd!
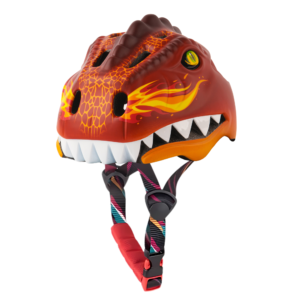
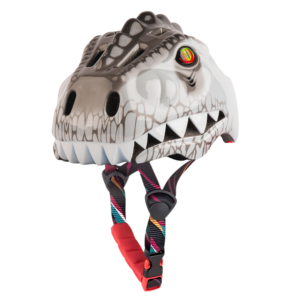
Pasting cutouts is an amazing way to decorate your kid’s helmets. Whether they dream of being a magical unicorn or a fierce dragon, you can easily bring their vision to life. Cutouts can be made of paper, lightweight foam sheets, or safe-felt fabrics. You can cut these into different shapes like dragon spikes, flames, animal ears, or even unicorn horns. Always secure it with a strong adhesive like hot glue or Velcro for a sturdy fix. Make sure the attachments added are lightweight and positioned safely to avoid discomfort while riding a bicycle.
If your child loves dragons, rainbows, or cool-shaped cartoons, then Headzup helmets are the perfect choice. These best kids’ helmets are made from strong, durable materials and provide abundant safety to your child.
It is a perfect way to decorate your kid’s helmet using DIY. LED lights, battery-powered, can turn an ordinary helmet into an attractive work of art. Additionally, it also ensures that your kid is visible during evening rides. You can wrap these LEDs around the helmet or place them in specific designs to enhance its look. Besides LEDs, you can also use reflective strips, a hassle-free and practical way to improve visibility without batteries. They reflect lights from streetlights and headlights, making your kid stand out in areas of low light.
With as small DIY customizations as these, your kid’s helmet can go from ordinary to extraordinary!
 27 August 2025
While outdoor sports like cycling, skating, and skateboarding are often celebrated for building physical fitness...
 25 August 2025
There’s a special kind of happiness that lights up a kid’s face the moment they...
 23 August 2025
Learning road safety is the most important skill to acquire before learning how to ride...
") 21 August 2025
21 August 2025
Riding a bicycle for the first time is often considered an adventurous and amazing milestone...
FIND WHAT MOVES YOU
FIND WHAT MOVES YOU
FIND WHAT MOVES YOU
FIND WHAT MOVES YOU
FIND WHAT MOVES YOU
FIND WHAT MOVES YOU